Monday, October 31, 2011

Candy overload!

When my kids go trick or treating, we are admittedly the parents that dig through the stash as soon as the kids go to bed. 

However, even I know when enough is enough.  This year, we are in a dire situation of Halloween candy overload. 


I decided to get rid of some of it quickly by using it in a recipe.  The rest will get saved for next year's trick or treaters.  Just kidding.  Maybe.

Anyway, this was such a sweet sensory overload that I will probably only make it on Halloween night, once a year, and that's it.  But it's definitely worth making that one time.  I have no idea what to call it, so I'll just call it baked candy apple slices with ice cream.

First, core and slice two apples.  Arrange them into a single layer in a cake pan or baking dish.  Preheat the oven to 350.


Next, pick out some candy.  I went with Butterfinger, Kit-Kat, M&M's, Snickers, and Milk Duds, purely based on personal preference.  However, I think any combination of chocolate would work well.

Chop the chocolate and mix it all together, like so.  Sprinkle generously over the sliced apples and bake until it's a giant melty gooey delicious mess.


Serve a few apple slices with some ice cream, keel over from the sugar shock, and toss the rest.  There's no need to save this caloric monstrosity.  You'll gain ten pounds just looking at it.  However, it's mighty tasty, especially the way the Milk Duds melt into the Snickers in a gooey, cavity-inducing concoction that Willy Wonka himself couldn't have better imagined.


Yum.

Sunday, October 30, 2011

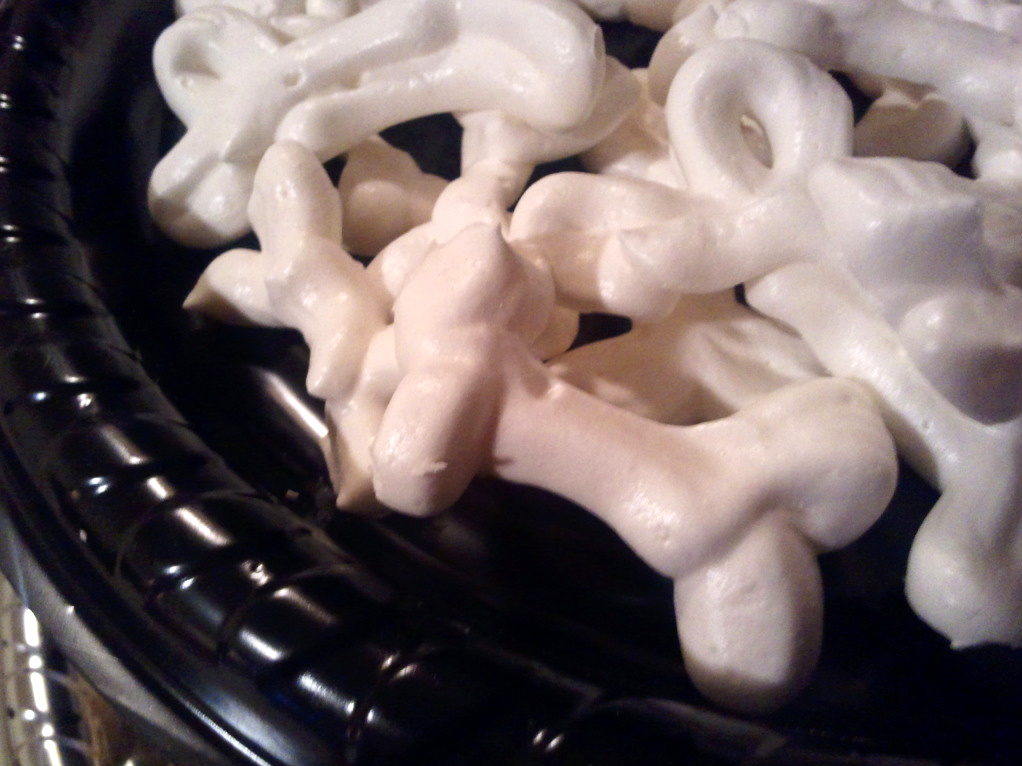
Eating fingers and bones.

Tomorrow is Halloween, and aside from our evening festivities, it's also Christian's Harvest Party at school. 

I volunteered to bring goodies, and since someone else had already signed up for cupcakes, I decided it was time to get creative.  I browsed the internet for hours for just the right combination of ease and ingenuity until I came upon this website entirely devoted to creepy edible Halloween recipes.

My family came to bake with me today, my beautiful niece Shea and my cousin Jamie, and we had so much fun making these Halloween goodies.


I decided on the Freaky Witch Fingers and the Brittle Meringue Bones.  Both were amazing looking, although the lack of sweetness in the shortbread may not be well loved by the 6 and 7 year olds at the party.  I'm including both of the recipes here, starting with the fingers, which were by far the easiest.


Freaky Witch Fingers

Ingredients:

1 cup butter, softened
1 cup powdered sugar

1 egg
1 tsp almond extract
1 tsp vanilla
2 2/3 cups flour
1 tsp salt
3/4 cup sliced almonds


In a medium bowl, beat together butter, sugar, egg, almond extract and vanilla, using an electric mixer. Then add in the flour and salt. Cover and refrigerate at least 30 minutes, as well as in between when you aren't using the dough. Roll about a teaspoonful of dough into a "worm" shape, about the size of a finger. Squeeze twice along finger length to create knuckle shapes. Press a sliced almond firmly into one end for the fingernail. Lay them on an aluminum foil covered baking sheet that has been sprayed with just a bit of cooking spray, then make slashes with a butter knife across in several places to form knuckles. I agree with the original recipe, which says to do clusters of three slashes for each knuckle.

Bake in 325 F oven for 20 minutes or until pale gold. Let cool for 3 minutes. Lift up almond, put a drop of frosting or a mixture of 1/2 c powdered sugar with a few drops of water onto nail bed and press almond back in place, otherwise they fall off too easily during storage and serving. 


These aren't incredibly sweet, as is standard for shortbread, and we thought they might be good if instead of almond extract and vanilla extract, you just doubled the vanilla. Also, I think it'd be a good idea to serve with red buttercream as a dip. 


Next came the bone meringues.  Today was my first meringue making attempt and Jamie and I washed our first two batches down the drain.  


After a bit of internet research, I found out our problem...  first of all, we were using a plastic bowl.  Plastic carries fat and doesn't allow the egg whites to reach the soft peak stage, so using glass or copper is optimal.  We also found that our egg whites had to be separated when cold then allowed to reach room temperature before the beating started.  So learn from our mistakes, and perhaps your meringues will be peaky and perfect on your first attempt.  Also, when storing, make sure to use an airtight container because any moisture will cause the meringues to become chewy and soggy.  That being said, here are the instructions.  I've adapted the recipe a bit from the way it was typed on the website I found purely for informational purposes. But when we got them right, we ended up with such a deliciously airy treat that it was definitely worth the added effort.


Ingredients:

3 large egg whites
1/4 tsp. cream of tartar
1/8 tsp. salt
2/3 cup white sugar
1/2 tsp. vanilla


Preheat oven to 200F. Line cookie sheet with brown paper bag or parchment, although I used aluminum foil and it worked just fine. In a medium sized bowl at high speed, beat egg whites until foamy and pour in cream of tartar and salt while continually beating. Gradually beat in sugar. Gradually means verrrry slowly, a teaspoon at a time, and make SURE to let all of the sugar dissolve fully before adding more.  I can't stress this enough. Add vanilla, still beating continually. Place in pastry bag fitted with a medium plain piping tip, or in a Ziploc bag with the tip cut off. Pipe 3" bone shapes onto prepared sheet. Bake 1 hour until set. Turn off oven, dry in oven 1 hour. Don't even open the oven to peek. Makes 4 to 5 dozen small finger-sized bones.  

Thursday, October 27, 2011

Time to find a new excuse...

...not to eat Nutella at least twice a day.  My old excuse was that it's too messy to pack up and take with me places, and that excuse is officially dead. 

I was buying diapers at Wal-mart this morning and saw this conveniently placed right next to the checkout.


So if someone happens to have a better excuse than my old one for not eating Nutella on the go, please, let me know.  Thanks.

Tuesday, October 25, 2011

Weeknight dinner WIN!

With Chad's newly diagnosed diabetes, dinnertime has become a bit of a struggle.  Until his blood sugar evens out, there aren't many options in the way of low carb dinners.

Someone pinned a cool idea for easy taco salad shells made from corn tortillas from emily bites and I decided to give it a shot for dinner tonight.  Let me just say that it was such a fun dinner that was so easily customizable for the whole family.


Anyway, it doesn't get much easier than this.  First I made taco meat with ground beef, spiced up a can of refried beans, chopped and diced tomatoes and toppings, and whipped up some guacamole.
Then I sprayed corn tortillas with cooking spray and placed them between four of the muffin cups on an upside down muffin pan.


Emily seemed to have no trouble with her tortillas but mine didn't like staying put to bake and crisp up, so I made a weight with dry rice wrapped in an aluminum foil ball and placed it in the cup so that it wouldn't slip.  I baked them this way for 6-8 minutes on 450, although you could reduce that to 400 and bake them a bit longer and not get the brown edges.


It was a win for us, kids love putting their own toppings in.  Taco meat, refried beans, shredded lettuce, tomatoes, guac, sour cream, and some shredded cheese made a delicious combination.  We'll definitely do this easy weeknight dinner again soon!

Monday, October 24, 2011

Webbed toes

I'm a holiday junkie.  I love overdoing it, from decking the halls to staging a graveyard.  I like the parties, the shopping, the cooking, the decorations... I even like wrapping presents.  That being said, I sometimes feel that my life begins with the start of October. 

A couple days ago, I felt it was close enough to Halloween to appropriately start scaring myself silly, change my ringtone to "Thriller," and give myself a Halloween mani/pedi. I also managed to sneak in a movie date to see Paranormal Activity 3 with my niece.  I'm still recovering from that one.


I kept it pretty simple.  Just two coats of glossy black then drew spiderwebs using a nail pen in white on my thumbs and ring fingers, and on my big toes and two little toes.  Then I used topcoat to ensure no-chip.
 

I have horrible feet.  They're ugly and I have stubby toes.  I'm also not a mani/pedi pro so my hand isn't super steady.  However, I had a great time with my little pre-Halloween weekend so I decided to share anyway.  I did get a bit impatient waiting for the black to dry so my webs are a little choppy because the paint underneath wasn't as dry as it should have been.  For maximum nail pen awesomeness, I recommend at least an hour of solid dry time.  Next time I'll do this while watching a movie so that I don't get so hasty.

Friday, October 21, 2011

Hoot hoot.

In August, my family participated in the Great Strides walk for Cystic Fibrosis in Stillwater.  My niece has CF, and every year we do what we can to raise funds for the Cystic Fibrosis Foundation because their awesome research potentially lengthens the life of someone I care about dearly.

Anyway, I always try to find creative things to make and sell, and this year these stuffed owls were a huge hit.

Aside from that, they're super easy and extremely addicting to make.  I'm including a tutorial, because I think everyone else will get addicted too, especially considering the endless options to customize them to whatever specifications they're looking for.

Basically, this is the owl.  Adorable, but a terrible picture.


Start with a pattern.  The owl in the picture was made from a freehand pattern, but I'll also include a picture of one you can print and enlarge, or copy from, or whatever.  It looks like this.


I just made it using Paint... no frills at all, but it's perfect for the purpose. 
Cut the pattern, pin your fabric, cut the fabric. Pin the owl and sew around the edges with about a 1/2 inch seam, leaving the space at the very bottom of the owl open for stuffing.  Turn it rightside out and stuff the owl and finish the bottom seam.  Then, cut a triangular beak from red or orange felt, and stitch onto the owl's face.  Use a shot glass to trace two circles on white felt.  Cut and stitch above the nose for eyes.  Sew black buttons in the middle of the circles, and voila.  So easy and cute!!  You can make it any size, out of any fabric, with any accessories.  I made my owl to match a black minky and floral fabric blanket I made, and I love the idea of making a big sweet hairbow and putting it on top of the owl's head as a gift set for a baby girl.  So cute!  Makes a great addition as a throw pillow in decor matching fabric for your living room or bedroom, especially a kid's room. 

And don't forget to support CF research.  Nothing's more close to my heart, and I know for a fact the research is making a real difference in lives.

Find out more at cff.org.  If you'd like to donate to my Great Strides fund, you can do so until Christmas by clicking here.

Wednesday, October 19, 2011

Angry baking

So tonight, I found myself unbearably and unreasonably angry.  Not at anyone, just at pure circumstance.  I'm sure you know what I mean... the moment when for no reason, you're ready to go to Wal-Mart just to start a fight with the first person that randomly stops their cart in front of you when you were obviously behind them in the aisle already. (I hate that.)

Christian wandered into the kitchen at just the wrong time, and I had to explain to him that the kitchen was like Mommy's time out chair...  It's where I go instead of the corner.  He wanted to help me bake so I told him that he could help but there could be no silliness... I was grumpy and this was serious baking.  Of course, it became a gigglefest. I adored every second.

Anyway, these cookies are simple, adaptable, and 55 calories apiece.  This recipe yields 5 dozen or so relatively small cookies, so adjust to your own liking and change bake times accordingly.

Ingredients:

2 cups diced apples
2 tsp pumpkin pie spice
3/4 cup softened pure butter
1/2 cup pure white cane sugar
1 cup packed brown sugar
1 cup whole wheat flour
3 cups old fashioned oats
1 tsp salt
1/2 tsp baking soda
1/4 c water
1 tsp pure vanilla
1 egg

Preheat oven to 350.  Beat sugars, butter, water, vanilla, and egg with mixer until creamy.  Mix dry ingredients in separate bowl and fold into wet ingredients. Add apple and pumpkin pie spice.  Scoop teaspoonfuls onto greased baking sheet and bake for 12-14 minutes.  Let sit for at least five minutes before removing to cooling rack.


Needless to say, I had cheered up dramatically from start to finish, and with a house scented with apples and spice it's hard to stay grumpy for long anyway,  I highly recommend this recipe for baking with the kids.  Maybe that's just because Christian and I had so much fun together while mixing these up.  Enjoy!