Saturday, December 31, 2011

Cheesy Broccoli Chicken & Shells

This was one of those nights when I opened the fridge and stared blankly into the abyss.  I shut the fridge and reopened it at least three times before removing the chicken.  That was step one.
Unsure of how to proceed, I moved on to the pantry, which I opened and closed at least twice before pulling out the pasta shells.  This continued until my counter was loaded with heavy cream, parmesan, frozen broccoli, chicken, mozzarella, butter, and shells.  Decided this was going to have to work and moved on to the cooking portion of the evening.


As I boiled the pasta, of course adding at least half a cup of salt to the hot water, I started a sauce.  I guess I could write this as a recipe in case anyone wants to make it, so here goes....

Ingredients:

1 lb uncooked chicken breasts, diced
1 package chopped frozen broccoli
1/2 cup heavy cream
1/2 cup Parmesan cheese, freshly grated
1/2 cup Mozzarella, shredded
1/2 cup butter
3 cloves minced garlic
Freshly ground salt and pepper, to taste
1 package pasta shells

Cook pasta to al dente.  Drain, reserving 1/2 cup of water. Pour reserved water back into pasta in a large mixing bowl.
In a skillet over medium heat, cook chicken in a tablespoon of olive oil until done.  Add butter and stir until melted.  Add garlic and saute 2 minutes. Stir in both cheeses and heavy cream, mixing well to incorporate. If it's looking like it isn't saucy enough, you might want to splash in some chicken broth.  Add in broccoli and cook at a light simmer until warmed through. Toss sauce with pasta.  Garnish with freshly grated Parmesan and basil.

I think this one was a winner, especially for one of those random dinners that was tossed together at the last minute.  Feel free to change it up as you see fit, exchanging the broccoli for sun dried tomatoes and sliced black olives, or roasted red peppers and sauteed mushrooms. The possibilities are endless!

Thursday, December 29, 2011

Cavities, anyone?

I made caramel corn tonight for the first time, and it was delicious.  But there isn't anything more comedic than looking around a room full of loved ones to see every last one of them picking their teeth with their fingernails in silence because no one could wait until the caramel corn was set up to eat it. Totally worth the extra tooth brushing time needed, though, I might add.


Homemade Caramel Corn

1 cup brown sugar
1/2 cup butter
1/2 cup corn syrup
1/2 tsp salt
1 tsp vanilla extract
1/2 tsp baking soda
4 quarts popped popcorn

Spray a roasting pan or shallow baking dish with cooking spray.  Preheat the oven to 250.  Pop 4 quarts worth of popcorn the old fashioned way, over the stove.  Pour the popcorn into the roasting dish.
In a heavy duty saucepan, heat the brown sugar, butter, corn syrup, and salt until it reaches a full boil, stirring constantly.  Turn the heat down to medium-low and let it boil for five minutes untouched.  Remove from heat and stir in the baking soda and vanilla.  Pour the caramel over the popcorn, stirring until very well coated with a rubber spatula.  Bake 45 minutes, stirring occasionally.  Turn out onto parchment ande stir with spatula, breaking apart as it cools.  Let cool twenty minutes and break apart last pieces.  Store airtight at room temperature for up to a week. 

My awesome sister in law kept sneaking bites, and got busted in the act.


It was a success, and kept everyone blissfully silent for a few minutes munching before the twenty minutes was up, and the caramel was still chewy.  Delicious!

Apple Fritters

I was in the mood for something easy, delicious, and slightly sweet today but wasn't sure what to make.  As I glanced through the fridge I remembered an episode of Rachel Ray that involved easy apple fritters and decided to make a spin on those.  They were perfect, and Brooklyn is still walking around with one in her hand as we speak.


Easy Apple Fritters:

2 c Bisquick
4 Granny Smith apples
1 1/2 c water
1 tsp cinnamon
3/4 tsp nutmeg

Heat 2 cups of vegetable oil in a skillet until a piece of bread turns dark golden in under a count of 40. Core the apples and slice them in 1/4 inch slices.  Mix the Bisquick, water, nutmeg, and cinnamon into a batter. Coat the apple slices and fry them until golden on each side, one at a time.  Drain on paper towels and sift powdered sugar on top.  Serve fresh.


So easy, delicious, and perfect for the whole family.  And leftover batter is perfect drizzled into hot oil til golden, drained on a towel, and with powdered sugar on top tastes remarkably like a delicious spiced funnel cake.

Monday, December 26, 2011

Simple Chocolate Cupcakes with Buttercream Roses

Christmas has come and gone, in a whirlwind of activity.  Baking, cooking, candymaking, cleaning, wrapping, unwrapping, hair-pulling, and loving, and now the aftereffects... cleaning and playing with new toys.  One of my new toys was an awesome decorating set that I decided to stay up all night messing with.  These cupcakes were the result of that playtime. As if I hadn't spent enough time in the kitchen the last two weeks...


Cake: adapted from here
Makes exactly 12 cupcakes or one double layer 8 inch round cake.

1 1/2 cups flour
1 cup granulated sugar
1 tsp baking powder
1/2 tsp baking soda
1/2 cup cocoa powder
1 1/2 sticks softened butter
2 eggs
2 tsp vanilla extract
2/3 cup sour cream

Preheat oven to 350. Dump everything into a food processor and pulse until well incorporated and a batter is formed.  Use a rubber spatula to scrape down the sides and mix well.  Divide into a prepared 12-cup muffin tin and bake 30 minutes or until toothpick inserted in center comes out clean.  If you don't have a food processor, measure the dry ingredients into a medium bowl and whisk to incorporate.  Mix the wet ingredients together well, then fold in the dry ingredients until the batter is formed.

Buttercream frosting:

1 cup softened butter
4+ cups powdered sugar
1 Tbsp heavy cream
Food coloring
1 tsp vanilla extract

Mix butter and 4 cups of sugar 3-5 minutes, until fluffy and light.  Continue mixing and add first vanilla, then cream, then food coloring.  Still beating, continue to add in powdered sugar until frosting reaches desired consistency.  I think for these cupcakes I used about 5 1/2 cups of powdered sugar so that the rose petals wouldn't lean into each other.

Helpful hint:
I set a baking sheet in the freezer.  After letting the cupcakes cool for fifteen minutes, I set them all on the baking sheet inside the freezer, removing them one at a time to frost them, then returning them to the freezer once they were frosted.  I left them in the freezer about fifteen minutes them removed to my cake plate. This help the buttercream stay stuff without melting down anymore and gave it a chance to set and reduce the risk of softening my rose petals.

To Frost:
Using my 104 tip, I created a small cone in the middle of the cupcake.  I formed three petals around the cone, pulling back slightly on each one to create a slightly folded look to the petal.  I continued out from the center, adding more petals until I reached the edge of the cupcake.  There are some really good Youtube videos about making buttercream roses that can describe it much more easily than I just did, though, so that would probably be smarter if you've never frosted flowers before.  It's not hard, it's just a lot easier if you've seen it done before trying it out for yourself. 

Thursday, December 22, 2011

Party!

Christian's school party is this afternoon, and for the occasion I wanted to find something to make that was all around accepted by everyone.  Something totally kid friendly, easily transportable, and that tastes as amazing as it looks.  And so we have... melted snowman cookies.

The sugar cookie recipe is one I particularly liked because of the soft fluffiness of the cookies.  They are sturdy but your teeth sink right in. Perfect for little hands and mouths.


Ingredients:
1 cup softened butter
1 1/2 cups white sugar
3 eggs
1 tsp vanilla
3 1/2 cups flour
2 tsp cream of tartar
1 tsp baking soda
1/2 tsp salt

Cream butter til fluffy.  Blend in sugar and continue beating 1-2 minutes. Mix in eggs one at a time, until well incorporated.  Mix in vanilla by hand.  In a separate bowl, whisk together flour, cream of tartar, baking soda, and salt.  Mix into wet ingredients by hand until a dough forms.  Transfer to plastic wrap and refrigerate overnight.
Preheat oven to 350.  Roll out dough on floured surface and cut into shapes with floured cookie cutters.  Bake 6-8 minutes or until very lightly golden. These get puffy in the oven so remember that when making your shapes.

To Decorate Snowmen:

Use cookie icing without any coloring (2 cups powdered sugar plus drizzles of milk until you reach desired consistency, about 2 Tbsp, plus 1/2 tsp vanilla) and frost the top of each cookie, allowing some to dribble down the sides of the cookies like melting snow.  Spray a microwave safe plate with a little cooking oil and place marshmallows on the plate.Microwave about fifteen seconds, just until they start to puff.  Remove from plate carefully, placing on each cookie along an edge. Pipe on eyes, a scarf, arms, and buttons for decoration.  

The only thing I didn't do was pipe on orange noses, which I will definitely do next time!  Other than the fact that these snowmen can't smell their own demise, these were a fantastic success!!

Tuesday, December 20, 2011

Dark Chocolate Creme de Menthe Cookies

Christian's class party is Thursday, and with it comes the dreaded Teacher Present.  The homeroom mother sent home a list of items his teacher likes, and chocolate topped the list.  So I've decided to make her a basket with lots of chocolate goodies.  This works out perfectly because I, too, have a love of chocolate.  This means I can make me a basket of chocolate goodies, too.  See?  Everyone's happy.


Dark Chocolate Creme de Menthe Cookies

1 cup softened butter
2 T olive oil
1 1/2 cups white sugar
2 eggs
2 tsp vanilla extract
2 cups flour
1 cup cocoa powder
3/4 tsp baking soda
1/4 tsp salt
1 cup dark chocolate morsels
1 cup chopped Andes mints

Beat together butter and sugar until fluffy.  Add in eggs and vanilla, beating well throughout.  In a separate bowl, whisk together flour, cocoa powder, baking soda, and salt.  Mix into butter mixture until evenly distributed.  Fold in olive oil until very well combined, then fold in dark chocolate and Andes mints.  Drop onto cookie sheet by the tablespoon, forming balls then pressing down slightly on them with the palm of your hand.  Bake in a preheated 350 degree oven for ten minutes.  Let cool on pan for 2 minutes, then remove to rack.

These are so amazingly delicious, I may have a hard time sharing with Christian's teacher.  She'll never know the difference...

Monday, December 19, 2011

Easy Cream Cheese Breakfast Cake

Today I woke up with a sweet tooth.  Not that this is different from any other day... but today I did something about it.  As I brewed my coffee I decided to throw together a breakfast cake with stuff I had laying around in my fridge. It was quick, easy, and seriously tastier than I could have imagined.


Cream Cheese Breakfast Cake
1 package refrigerated crescent roll dough
1 8 oz package cream cheese, room temperature
1 1/2 cup powdered sugar
3/4 tsp vanilla
1/4 cup melted butter or margarine

Crumble
2 T flour
2 T white sugar
1 T cinnamon
2 T cold butter

Preheat oven to 375. Lightly grease a loaf pan. Press 4 of the crescent rolls into the bottom of the pan, using your fingers to press the dough up the sides about half an inch.  In a small bowl, use a fork to mix cream cheese and powdered sugar until smooth and creamy.  Mix in vanilla.  Spread cream cheese mixture over the crescent rolls in the pan.  Lay the remaining crescent rolls over the top of the cream cheese without pressing down. Pour the melted butter evenly over the whole thing.
Make crumble by whisking together flour, sugar, and cinnamon then cutting in butter until the mixture resembles coarse crumbs.  Sprinkle over the top of the cake evenly.  Bake 20 minutes.  The middle will be a little gooey and the edges will be perfectly crisp.  Let sit five minutes before cutting.  Serve warm with hot coffee.  Yum!!

Sunday, December 18, 2011

A Vegetarian Dinner Delight

My mother and father in law have been eating nothing but restaurant food for the last two months, with so much going on in their lives, and tonight I wanted to give them a delicious home cooked meal that filled their bellies and treated them to something different than they've been eating lately.

Since they're vegetarians, this was a great time to introduce meatless meals into my family's week.  Old fashioned Italian minestrone and spinach artichoke stuffed white mushrooms.  I stuffed myself silly, and never even noticed the lack of meat.


Minestrone:
3 tablespoons olive oil
 4 cloves garlic, chopped
2 red onions, chopped
2 cups chopped celery
5 carrots, sliced
2 cups chicken broth
2 cups water
4 cups tomato sauce
1/2 cup red wine
1 can  kidney beans, drained and rinsed
2 cups baby spinach, rinsed
3 zucchinis, quartered and sliced
1 tablespoon chopped fresh oregano
2 tablespoons chopped fresh basil
salt and pepper to taste
1/2 package medium shells, cooked
Freshly grated Parmesan for topping

Heat olive oil in a stock pot.  Saute garlic on medium low for about two minutes.  Add onion and cook for another 4-5 minutes.  Add carrots and celery, mix well, and cook for five minutes.  Stir in water, broth, wine, and tomato sauce. Mix well and cook to a simmer.  Add in kidney beans, zucchini, baby spinach, oregano, basil, salt and pepper. Mix well and cover. Reduce heat to low and simmer for 40 minutes. While waiting, boil 1/2 a package of shells to al dente. When the soup is ready, put about 1/2 a cup of pasta in the bottom of a soup bowl.  Ladle minestrone over the top.  Garnish with freshly grated Parmesan and fresh basil.


Spinach and Artichoke Stuffed Mushrooms
25 white mushrooms, stems removed and gills scraped out
4 ounces cream cheese
2/3 cup mayonnaise
14 ounce can of artichoke hearts, excess liquid squeezed out and finely diced
1 cup frozen chopped spinach, thawed and squeezed dry
3 cloves minced garlic
1 tsp sugar
1 cup freshly grated Parmesan
Pinch ground red pepper

Preheat oven to 350. In a large bowl, combine softened cream cheese, mayo, artichoke hearts, spinach, garlic, sugar, Parmesan, and red pepper.  Mix well.  Stuff mushrooms and place in a baking sheet with sides (the mushrooms will secrete excess liquid while baking) and grate some extra Parmesan over the top. Bake 15-20 minutes, until lightly browned.

I hope they enjoyed dinner as much as I did.  I served sliced Italian bread with a balsamic/olive oil mixture beforehand and the soup alongside a mozzarella, pesto, and sun dried tomato grilled cheese brushed with olive oil.  It doesn't get much better than this.

Tuesday, December 13, 2011

Warm & Fuzzy 1 hr, 1 skein Scarf

Today I went to Hobby Lobby with my cousin-in-laws Jessie & Jamie. Aside from the fact that Brooklyn started with her diva syndrome within five minutes and beat up every one of us at some point, it was paradise.  I love Hobby Lobby, and I love the 40% off mobile coupon I use every time that you can use too, here

Anyway, Jessie has this pink fuzzy scarf that just looks like a heatwave, it's so warm and fuzzy.  I, too, wanted a fuzzy scarf and wanted to make scarves that I could perhaps sell for Christmas money, also.  So I came up with this scarf pattern... it comes together in one hour with one skein of yarn exactly, tip to tip.


Stuff to buy:
P-16 11.5 MM crochet hook
1 skein Yarn Bee Riot Eyelash sparkle yarn
1 hour of time

Chain 10.  Skipping the last two chains, begin in third chain and half double crochet into the next eight stitches. Chain two, rotate, and starting in first stitch, half double crochet across row, eight total stitches.  Repeat and continue for 80 rows.  Finish edge and measure 16 ten inch strips of yarn. To make the fringe, fold a strip in half and pull through the first stitch on the end of the scarf, pulling end to end so that equal lengths of the strip are on either side of the stitch. Tie in a knot to secure in place. Repeat through the other 7 stitches on the end, flip to the other end of the scarf, repeat through the eight stitches on that end. Then your scarf is complete, and should look much like the beautiful one that Jessie is modeling here.

Monday, December 12, 2011

Perfect in every way Chocolate Chip Cookies

I've been looking forever for a cookie recipe that is good for my whole family.  Chad likes them thin, chewy, fresh from the oven, and completely cooked all the way through.  I like them thin, crisp around the edges, gooey in the middle, and filled to the brim with chocolate and walnuts.
These cookies are perfect for both of us because I can make his on one tray, mine on another, and cook his three minutes longer and they're just right. Great for movie night with a cup of cold milk and fresh homemade popcorn.


Ingredients:
2 1/2 cups flour
1 tsp baking soda
1/ tsp salt
1 cup olive oil
1 cup packed light brown sugar
1/2 cup white sugar
2 eggs
1 1/2 tsp vanilla
1/2 tsp almond extract
1 11.5 oz package chocolate chunks
1 cup walnut pieces

Preheat oven to 350. Whisk together flour, baking soda, and salt.  In a separate bowl, mix brown sugar, sugar, and oil until well combined.  Slowly mix in eggs, vanilla, and almond and then fold in chocolate chunks. Bake anywhere from 8-13 minutes, depending on taste, 8 for a gooey cookie, 10 for soft center and crisp edges, and 13 for a crisp cookie throughout.

I leave out the walnuts in Chad's cookies and add them in to half the dough, which is why I didn't include that in the recipe.


They're also great for a fun afternoon with the kids, letting them add in whatever they want in lieu of chocolate chunks.... gummi bears, nuts, M&M's, raisins, anything goes. Have fun!

These are great to throw together for parties, new neighbors, unexpected guests, or movie night. 

Sunday, December 11, 2011

Oh Steve, stop it.

Steve the Scout Elf has been quite mischievous tonight.


He has toilet papered Christian's bedroom door.  Christian will have to break out in the morning when he wakes up. 

Silly Steve.

Snowman Poop and pumpkin cream cheese muffins!

Every year since fifth grade, my girlfriends and I get together for a Christmas gathering, a relaxed party with just the few of us with wine, lots of dessert, Dirty Santa, board games, comfy clothes, and bare feet.  It's been harder and harder for us to do this as we grow older and older and get more and more responsible, but life is too short to not be able to set aside one day a year to see old friends that are dear to you.
This year we met at my beautiful friend Melissa's house, played Apples to Apples and Loaded Questions, drank wine, and ate copious amounts of chocolate truffles, pumpkin cream cheese muffins, and snowman poop.  Yum.

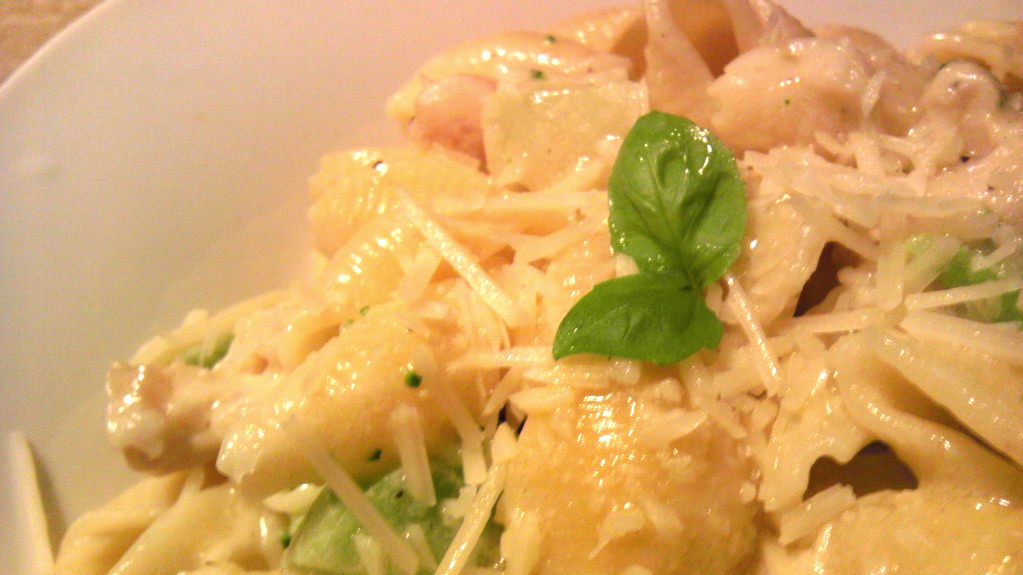
I know typically pumpkin season is over and done with by now, but per special request, these pumpkin cream cheese muffins made the perfect pumpkin farewell til next season.


Ingredients (adapted from Annie's Eats)
Topping:
½ cup sugar
4 tbsp. flour
1½ tsp. ground cinnamon
4 tbsp. cold unsalted butter, cut into pieces

Mix dry ingredients with whisk, then use a fork to cut in the butter until mixture is crumbly. Refrigerate until ready to use.


Filling:
8 oz softened room temperature cream cheese
1 cup confectioner's sugar

Mix well until fully incorporated and lump free.  Store in refrigerator until ready to use.

Muffins:
3 cups all-purpose flour
1 tsp. ground cinnamon
1 tsp. ground nutmeg
1 tsp. ground cloves
1 tbsp. plus 1 tsp. pumpkin pie spice
1 tsp. salt
1 tsp. baking soda
4 large eggs
2 cups sugar
2 cups pumpkin puree
1¼ cups vegetable oil

Preheat oven to 350.  Line muffin pan with paper liners. In a medium bowl, combine the flour, cinnamon, nutmeg, cloves, pumpkin pie spice, salt and baking soda; whisk to blend.  In a separate bowl combine the eggs, sugar, pumpkin puree and oil.  Mix on medium-low speed until blended.  With the mixer on low speed, add in the dry ingredients, mixing just until incorporated.

To assemble muffins, put a tablespoon of batter into the bottom of each liner.  Spoon in about a teaspoon of cream cheese filling.  Cover the filling with more batter, just to the top of the paper liner.  Sprinkle crumble on top.  Bake 20-25 minutes.  Cool before eating, even though it seems impossible.  The filling stays hot for a while so indulge with care!!

The snowman poop was a lot of fun. They're actually just lightly flavored vanilla meringues and can be piped into any design.  I also did some snowflakes and Christmas-y words, like hope and joy.  However, they're so delicate I highly recommend just making snowman poop if you're planning on taking these out of your house. Even moving them from countertop to table proved to strenuous for the more delicate pieces.


Ingredients:
3 egg whites, room temperature
1/4 tsp cream of tartar
2/3 cup sugar
1/2 tsp vanilla


Preheat oven to 200. In a glass bowl, mix egg whites on highest speed until foamy. Add in cream of tartar and mix well.  Slowly add sugar, a teaspoon at a time, making sure all sugar is well distributed from each teaspoon before adding more. Beat on high until stiff glossy peaks form. Fold in vanilla just until incorporated.
Spoon meringue into  pastry bag or a Ziploc bag with the corner clipped off.  Pipe your poops onto parchment lined baking sheet.  For best results, keep them about 1/2 inch to 1 inch in diameter and up to 1 inch tall. Bake at 200 for one hour, then turn off the oven and leave them to dry out for another hour.  Resist temptation and don't open the oven door at all throughout the process!

We had a blast eating everything in sight and playing games until late, and I can't wait to see what we come up with for next year!

Wednesday, December 7, 2011

Decorating Cookies

Yesterday, I made butter cookie dough and stashed it in the fridge as today's after school project.  We decorated to our little heart's content, in the most messy and disorganized way possible, and had a blast doing it.  The result was delicious tasting yet interesting looking cookie with sloppy, beautiful decorating.


Cookies:
1 cup butter, softened
2 tablespoons vanilla extract
3 cups flour
2/3 cups sugar
2 large eggs
1/2 teaspoon salt

Beat butter and sugar til fluffy. Stir in vanilla extract. Add in eggs, one at a time, beating mixture after each egg addition. Add the flour and salt, mixing well. Wrap in plastic wrap and let chill in refrigerator 3 hours or overnight. On a sparsely floured counter or board, using a floured rolling pin, roll dough to 1/4 inch thick. Cut with cookie cutter into Christmas shapes. Place each about 1 inch apart on baking sheet. Bake for 8 minutes at 350 degrees F. Allow to cool complete before decorating. Recipe makes about 4-5 dozen cookies.


Icing:
1 cup powdered sugar
2 tsp milk
2+ tsp light corn syrup
1/4 tsp vanilla extract
Food coloring

Mix powdered sugar and milk until even consistency.  Add 2 tsp of corn syrup and vanilla extract and mix well.  Add more corn syrup until you reach an icing slightly thicker than desired.  Divide into separate bowls and add food coloring, which will thin the icing a bit.  I divided into thirds.  I left one white, and used 4 drops of red in one and 4 drops of green in the other.

Our cookies are fantastic, and I know they'll be even better tomorrow after the icing has sat for a bit. Yum!!

Tuesday, December 6, 2011

10 Minute Donuts

I feel like I'm cheating, blogging about something so easy.  I had planned on making butter cutout cookies tonight and decorating them with Christian, but the dough takes so long to set up that I decided it was best to put the dough in the fridge and bake them tomorrow when he gets home from school.
Christian was so disappointed when he found out we weren't decorating cookies that I knew I had to come up with something, anything, different and fun that wouldn't take long to make.  Bedtime was an hour and a half away and he still needed to do his bedtime routine.


I saw these donuts on Pinterest the other day and they're made the same way I make Chinese fried bread (lazy) so I knew they would be tasty.
The process is simple and completely foolproof.  Take the lid from a 2 liter pop bottle and open a can of biscuit dough.  I used the Texas sized homestyle biscuit dough for these, because I happened to have it in the fridge already.  Lightly press on one of the biscuits to make sure it's a uniform circle.  Press directly in the center with the bottle lid, cutting out the "hole."
Continue doing this until you've made "donuts" out of all the biscuits in the can.  Heat about 3/4" of oil in a skillet over medium heat until a donut hole sizzles around the edges. Drop in the donuts and holes and cook about 30-45 seconds per side, until golden (light golden for a really soft donut and deep golden for a donut with a more crisp outside.)
Drain on a paper towel then you can coat in a glaze.  I made chocolate glaze (mix 1 Tbs cocoa powder, 1 cup powdered sugar, 2 Tbs milk) or a clear glaze (1 cup powdered sugar mixed with 2 Tbs milk or 1 1/2 Tbs water) or you can do what she did in the original blog recipe, found at Southern Plate, which is a quick dip in melted butter followed by a roll in a mixture of cinnamon and sugar.


What a cheap, easy dessert or breakfast idea! And they take no time at all, the perfect breakfast for the morning after a slumber party or for a class party at school.  You could even go the extra mile and dip them in sprinkles after glazing.

I really do feel like I'm cheating because this whole process took no more than ten minutes and within 15 minutes Christian and I were both eating a fresh donut, with plenty left over for breakfast tomorrow. 

Sunday, December 4, 2011

White Manicotti

Chad has been complaining that dinner has been the same lately... nothing new.  Just repeats of the same typical things I make week after week.  And he's right, I've been lazy with dinner lately and I've been making all the easy throw together dinners that work every time.

Tonight I decided to try something different.  This white manicotti was simple but delicious and came together pretty quickly. I was a little nervous because I didn't base it from any recipe, and was unsure about the richness.  It ended up being pretty rich but in a good way.


Ingredients:
1 lb uncooked diced chicken breast
10 manicotti noodles
1/4 cup Italian dressing
1 tsp garlic powder
Cracked salt and black pepper
4 ounces cream cheese
1 16 ounce package shredded mozzarella
1 recipe Alfredo sauce (here) or 1 jar alfredo sauce, for weeknight dinners
Thick sliced bacon, cooked until crisp and crumbled
Fresh basil, for garnish

Boil noodles in a large pasta pot until almost al dente.  In the meantime, saute the chicken in a little olive oil in a skillet.  When it's no longer pink add the Italian dressing.  Simmer until chicken is browned. 
Preheat oven to 425. Put cream cheese, 1/2 cup shredded mozzarella, garlic powder, and salt & pepper to taste in a medium bowl.  Pour hot cooked chicken over the cheese mixture, scraping bottom of pan.  Mix until creamy.  Set aside.
Rinse manicotti noodles with cold water for easier handling and fill with chicken mixture.  Oil a baking dish and spoon a bit of alfredo sauce into the bottom.  Line the pan with the stuffed manicotti. Pour remaining alfredo over the top and bake twenty minutes.  Add remaining mozzarella to the top and bake for another ten minutes.
Serve with crumbled bacon on top and fresh basil as garnish.

Chad not only was pleased to have something different for dinner, he said that this is by far the best Italian dish he's had, anywhere, ever.  If you know us, you'll remember that Chad's palette is not always an easy one to impress.  Hopefully this goes over well with anyone else that tries it too.

Spiced Ginger Cookies

I've been feeling especially festive lately, and last night's Bedlam win to OU really put this Pokes fan in the baking spirit.  I wanted to make gingerbread men wearing football helmets, but I didn't have any molasses and, living in Stillwater, it just wasn't a safe idea to get out driving around right after the football game to buy molasses.
I decided to make a couple of substitutions to the gingerbread recipe and make do with what I had, and instead ended up with more of a gingery spice cookie that spreads a bit when baking so it's not as well adapted to cutouts as gingerbread is.  It's delicious and festive, though, and with a standard cookie icing as decoration, it's the perfect combination of sweet and spicy.


Ingredients:
1/2 cup softened butter
1/2 cup sugar
1/2 cup dark corn syrup
1 large egg yolk
2 cups flour
1/2 tsp salt
1 tsp ground clove
1 tsp ground ginger
1/2 tsp cinnamon
1/2 tsp nutmeg
1/2 tsp baking powder
1/2 tsp baking soda

Cream butter and sugar together in large glass bowl til fluffy.  Mix in egg yolk and corn syrup until smooth.  In a separate bowl, whisk together flour, salt, clove, ginger, cinnamon, nutmeg, baking powder, and baking soda.  Fold the dry ingredients into the egg mixture until dough is formed.  Cover and refrigerate for at least an hour.
Preheat oven to 350 and coat hands in flour.  Roll dough by teaspoonful and press into a disc about 2 inches in diameter.  Spread far apart on baking sheet, 6-8 per sheet, as they will spread thin. Bake for 10 minutes and let cool completely before decorating.
I used a mixture of just water and confectioner's sugar for the icing because I was out of milk.  Starting with a cup of powdered sugar, slowly dribble very small amounts of water in, mixing thoroughly with a fork before adding more, until you reach the desired consistency.  I used about 3/4 tsp water for my cup of sugar.  It was somewhat thick but made for perfect snowflake piping.


These cookies were even better this morning, after they'd sat overnight, so I think they're a great cookie jar cookie.  And adding the OSU logo makes them all the better this year!  Go Pokes!

Thursday, December 1, 2011

Chocolate and wine are never a bad thing.

Recently, I needed a big favor from my sweet friend Melanie.  This was one of those favors that involved babysitting a vomiting, feverish baby for a couple of hours in her office... definitely not fun. 
I thought and thought about what I could do to thank Melanie for helping me out, and there are two things in life that I know she loves probably more than anything... wine and chocolate.  Girl after my own heart.


These red wine chocolate truffles are decadent, pretty, creamy, and package up beautifully for gifting.  The ganache is simple but effective, and the Ghiradelli baking chocolate bar sets well and is perfect for the purpose. My truffles didn't turn out nearly as pretty as the original but the taste makes up for it monumentally.

Ingredients (adapted from Sprinkle Bakes)

Dark chocolate melting wafers
8 ounces Ghiradelli 60% cacao (2 baking bars)
1/2 cup heavy cream
5 Tbs red wine


Prepare ganache first.
Chop baking bars into a glass bowl.  Heat heavy cream in a small saucepan until small bubbles form around edges.  Pour cream over bars and stir until melted.  Stir in red wine, one tablespoon at a time, until completely incorporated.  Refrigerate until ready.

In a double boiler or a glass bowl sitting atop a small saucepan simmering water, melt the wafers, stirring until smooth.  Spoon about 1/2 tsp of melted chocolate into the bottom of each section of a silicone candy mold.  Use a 1/2 inch wide paintbrush to brush chocolate up the sides of each mold until the mold is completely coated.  Pop it into the freezer for a minute or two and then repeat until there are no thin spots in the coating.  You can hold the molds up to the sunlight to see if there are any translucent spots.  Freeze an additional minute or two when you're sure it's well coated.  Using a piping bag, pipe the ganache into each mold to just below edge of coated chocolate.  Stick it back in the freezer for a couple of minutes.  Pipe more melted chocolate to cover and give it a little shimmy to set the chocolate to help ensure a flat bottom.
Put the whole finished product back into the freezer for about five minutes to make sure they're set.  To free the truffles from the mold, just loosen from the silicone carefully and press gently upward in the bottom center of each mold until the truffle pops out.  My edges weren't all clean, so I used a knife to shave the uneven edges of the bottom of each truffle so they would sit evenly.

These are a simple way to impress even the most critical holiday guest and made a perfect thank you for Melanie.  I packed four of them up in a square box, tied with raffia, and it made a nice little mid-day treat when Brooklyn and I dropped them off at her office.

Tuesday, November 29, 2011

Delicioso!!!

My husband's all time favorite soup in the world is the chicken enchilada soup from Chili's.  Not only is it a financial downfall to go to Chili's twice a week so that he can enjoy this soup, it's also extremely difficult with Brooklyn, whose idea of a perfect mealtime is to scream as loud as she can while chucking food in random directions and growling like a wild dog when she doesn't get a drink in time.
Therefore, I started exploring the internet, trying to find a good copycat recipe that would satisfy Chad.  After trying probably 6 or 7 different recipes with no perfect results, I decided to start reinventing some of those recipes until I came up with one that worked for us.  You can find the closest cousin of my final result here, which is where my search ended with my last attempt, but my recipe really varies a lot from it as well.  But, for the sake of citing my research, there it is anyway.


Ingredients:

1 cup chicken stock
3/4 cup butter
1 diced yellow onion
1 3/4 tsp ground cumin
2 1/4 tsp chili powder
2 tsp garlic powder
1/2 tsp salt
1/2 tsp red pepper
1 3/4 c masa harina
4 quarts water
1 1/2 c crushed tomatoes
1/2 pound cubed Velveeta
4 ounces shredded cheddar
2 lbs cubed cooked chicken breasts
Toppings (sour cream, pico, chives, tortilla strips, etc.)

Melt butter in a large pot.  Add onions, saute til translucent.  Add chicken stock and spices, mix until stock is melted down. 
In a large bowl, whisk masa harina with 1 quart warm water until no lumps remain. Add to pot, whisking constantly til well combined.  Stir continually over medium heat for 2 minutes or so and add tomatoes. Add remaining water to pot and mix well.  Let simmer ten minutes or so, stirring occasionally, then add cheese. Stir until all cheese is melted and combined.  Add chicken, cook another 5 minutes, stirring continually. Serve with a little shredded cheese on top, along with some tortilla strips and pico.  Chad loves it with sour cream.

It's not an exact match but I actually think it's better than the original. And, it's as close as you'll get without having the recipe from the restaurant itself.  Delicioso!

Sunday, November 27, 2011

Let's all welcome Steve to the family...

Tonight we bought our Elf on the Shelf.  After reading the story and getting super excited about the fact that an ELF was going to be sharing our home until Christmas, Christian started dreaming up names.  I tried to help him along with some creative choices, like Nimble or Drizzbee... something with some inspiration behind it.

"I want to name him Steve."

Not Googly Boogly Tra La La?  Or Superhero Stan?
Not Grizzlebump or Flaggard?

"I want to name him Steve."

Ok.  Steve it is.

So welcome, Steve, to our humble abode. 

We sent him packing for his first trip to the North Pole with a hot cup of coffee (because it was an overnight trip and we didn't want him to tire out on the way) and a lengthy spiel for Santa from Christian.

Apparently, when he got back, he noticed that our tree had no star as of yet (I'm working on it. Don't judge me.)

He sits perched on a tree branch, with a note:


Christian,
Thanks 4 the coffee.
It was just the lift I needed to get to the North Pole.
Santa says "hello."
I noticed your tree had no star.
Since you're a star, I put you there.
Thanks,
Steve the Elf


Hopefully Steve settles in well.  I know we're all excited to have him, and can't wait to see what comes next!  I would also like to report that Christian went to bed tonight, knowing Steve was watching, better than he has in at least six months.  Perhaps having a snitch around is a good thing... can't wait until Brooklyn learns to talk.

Saturday, November 26, 2011

A little burnt out on pumpkin pie...

We already had one massive Thanksgiving meal, and tomorrow my dad is coming up from the city for our second go-round.  The problem is, I've already had my fill of pumpkin pie.  That, and I don't' have any evaporated milk and I really don't feel like changing out of my pajamas and house shoes to go get some. Just being honest...

Instead, I consulted my pantry to see what I did have, and decided to make this:


Pumpkin cranberry bundt cake with candied walnuts and caramel drizzle.  It was a lot more complicated than pumpkin pie but the rewards are neverending.  My dad will love me.

Ingredients:

Pumpkin Cranberry Bundt Cake (adapted from here)

Note-- this can also be made as muffins or in a loaf pan as a quickbread.  It's amazing either way.

Ingredients 

3 cups flour
5 1/4 tsp pumpkin pie spice
1/4 tsp ground clove
2 tsp baking soda
1 1/2 tsp salt
3 cups granulated sugar
1 cup pumpkin puree
4 eggs
1 cup vegetable oil
1/2 cup orange juice
1 cup or more dried cranberries

1/2 tsp sugar
1/2 tsp cinnamon

Preheat oven to 350.  In a small bowl. mix together the 1/2 tsp sugar and cinnamon.  Grease a bundt pan coat with sugar/cinnamon mixture.
Mix flour, spices, salt, and baking soda in a large bowl.  In a separate bowl, combine sugar, pumpkin, eggs, oil, and orange juice.  Mix into wet mixture just until blended, then stir in cranberries.  Pour into bundt and bake for 1 hour or until knife inserted in the center of one side comes out clean.  Cool 1 hour in refrigerator before turning out.

Caramel Drizzle (adapted from here)

Ingredients

1 cup butter
2 1/3 cups brown sugar
Dash of salt
1 cup white corn syrup
1 can sweetened condensed milk
1 tsp vanilla

Melt butter over medium heat.  Add brown sugar and salt, mix until well combined.  Add corn syrup and sweetened condensed milk and boil until just past the soft ball stage, about 8-10 minutes.  Remove from heat and stir in vanilla.  This makes more than enough for a drizzle so feel free to remove about a cup and a half into a glass bowl for drizzling and then continue to cook to hard ball stage and pour out onto parchment lined baking sheet to cut into caramels later. Or, as I did, dip an apple into it and let that harden as well.  We make good use of our caramel around here.

Candied walnuts (adapted from here)

Ingredients:
1 pound walnut halves
1 cup white sugar
2 tsp cinnamon
1/4 tsp ground clove
1/4 tsp salt
6 Tbs milk
1 tsp vanilla extract

Roast walnuts 8-10 minutes in 350 degree oven.  Remove to cool. Combine sugar, salt, cinnamon, clove, and milk in a saucepan over medium heat.  Cook, stirring constantly, to boil until soft ball stage, about 8 minutes.  Remove from heat and stir in vanilla.  Stir in walnuts until well coated and pour out immediately onto parchment covered baking sheet and separate with a fork quickly.  These set fast.  Great for holiday gift giving on their own, as well.

To assemble, just slice a piece of cake, toss a few candied walnuts on top, and drizzle with warm caramel.  Feel free to heat the caramel up in the microwave for a few seconds to soften up if it sets too quickly.

Friday, November 25, 2011

Salt Dough Traditions

Now that Thanksgiving is over (almost... we still have family coming on Sunday) it's time to get into the Vince Guaraldi spirit... that is, Christmas time is here!

I spend all year just waiting patiently for the holiday season to start.  It's so warm and cozy to be in the Christmas season... hot cocoa, watching snow fall, warm pj's and fuzzy slippers, family, traditions, food, and sparkly things.

I try to combine as much of the above as possible for the optimal holiday experience, namely traditions.  One of ours is the making of salt dough ornaments for our tree every year.  We have such a fun time as a family painting and decorating our ornaments, and they're such a fun little gift to give as an accessory on gift wrap or part of a basket for a neighbor.

Ingredients:

1/2 cup table salt
1 cup flour
1/2 cup lukewarm water

Mix the salt and water together.  Slowly stir the salt water mixture into the flour with a fork until a dough forms.  Knead for about a minute and a half.  This makes approximately 20-24 ornaments.  After your ornaments are formed, use a straw to put a hole for the ribbon or hanger and lay them all out on cookie sheets.  Dry in the oven for two hours on 200 degrees Fahrenheit and after cooled, they're ready for decorating!


I like using acrylic paints and glitter but really, you can do almost anything with these.  They're a great kids craft and we enjoy it every year.  Another fun trick is to mix a little ginger and cinnamon into the dough for gingerbread ornaments that smell like Christmas for years to come.


This is one of my favorite family traditions because every year, I can look at our tree and see the love we've shared years past as my children grow.  Our tree becomes a custom memory that can't be replicated anywhere else... priceless.

Wednesday, November 23, 2011

Eggnog Cookies, Eggnog Icing... win, win.

Yesterday, my family braved the supermarket for the Thanksgiving shopping rush.  As I rushed around, elbows out, pawing my way through shoppers for the groceries necessary for a successful Thanksgiving spread, my head was filled with lists of ingredients... sage, heavy cream, eggs, chives, potatoes... eggnog.  I know eggnog is typically a Christmas treat, but an almost pregnancy-strong craving for eggnog overwhelmed me so I decided to find a way to incorporate eggnog into our feast, even if I was the only one that indulged.

After browsing for some eggnog-inspired baking ideas, I came across this recipe for eggnog cookies and icing from The Family Kitchen.  I decided that with a few tweaks on the original, this was a winner.


Ingredients:

2 sticks butter
1 cup sugar
1 egg, room temp
1 c eggnog
3 c flour
1 1/2 tsp baking soda
1/2 tsp salt
3/4 tsp nutmeg

Eggnog icing:

2 c confectioner's sugar
5 Tbs (give or take a bit) eggnog
1/2 tsp nutmeg

Beat butter and sugar til fluffy with an electric mixer.  Add egg, continue beating, add eggnog and mix til well incorporated.
 
In a separate bowl, whisk together flour, nutmeg, and baking soda.  Carefully fold into wet ingredients just until combined.  Cover, and chill for two hours.

Preheat oven to 350 and drop dough by teaspoonfuls onto ungreased baking sheet. Bake 10-12 minutes or until edges are just browned.  Let cool on pan 5 minutes before removing to rack.  Make glaze by mixing the icing ingredients together til well blended and frost cookies when cooled.


Enjoy these with a hot cup of cider on a cold evening for a pre-Christmas treat that's sure to warm you up!

Tuesday, November 22, 2011

Back to the Basics

Lately I've been trying to think of all the gooey deliciousness that comes with holiday baking, and testing out new recipes for things I haven't tried before, but nothing was hitting the spot.  I've been in the mood for something gooey, chocolatey, and simple to make with everything I already had in my pantry.  It never struck me that I could go back to the basics and make something perfect that is as timeless as it is simple.

These no bake cookies are seriously mess-up proof, and everyone loves them.  Ever since I was a kid I have loved the gooey goodness of a chewy no-bake cookie.  And somehow, every childhood class party or holiday office gathering has had someone bring in a batch of them.  They're always there, in the background, making their appearance at just the right time.


I haven't made them in years, so I thought it was about time to introduce my kids to them.

Ingredients:
3 c quick cook oats
1 3/4 c white sugar
1/2 c milk
1/2 c butter
4 Tbs cocoa powder, unsweetened
1/2 c peanut butter
1 tsp vanilla extract

Combine sugar, milk, butter, and cocoa in a medium saucepan and cook, stirring constantly, to a full rolling boil. Cook for 90 seconds at the full boil.  Less and your cookies won't set up, and more means they'll be a crumbly mess.  Turn off the heat and add in the peanut butter, stirring until melted and thoroughly combined.  Stir in vanilla and oats til fully encorporated and spoon onto wax paper in desired cookie size and shape.  I recommend refrigerating overnight to ensure full setup., and for storage without too much extra stickiness.  Layer between parchment for transport.


These are age old classic cookies that I'm sure everyone remembers and loves, and they're the perfect tag-along for a holiday party when you just don't have time to impress everyone with your baking skills.  Or when you want to pretend that you don't have time when really, you just don't have baking skills, although I like to think the former.

Monday, November 21, 2011

Magnets from vase filler?

Every day, I look at our fridge and think about the fact that someday, I really need to make some magnets that don't look ridiculous for our paperwork.  I put Christian's artwork and important information on the fridge, like many people do, and all I had for a magnet was an old heating and air conditioning ad magnet that I'd torn in half to make two magnets.  Obviously this wasn't really working out.


I took vase filler, a Sharpie, plain white acrylic paint, and magnetic strips and half an hour later, I had a pretty cute little magnet set that definitely beats the stupid heating and air half-ads.


First I drew the letters and a few shapes on the back of each vase filler stone with a black Sharpie marker.  I did some hearts and crosses, and two of each letter-- one  capitol and one lowercase. After that dried, I painted over just the back with acrylic paint, using an old eyeshadow applicator as a sponge painter.


I cut the magnetic strip into tiny little squares that would fit on the gems and after the paint dried, I used a tiny dab of hot glue to apply the magnet to the back of each stone.


That's it, it was that simple.  This would make a really cute gift, and would be adorable spelling out bible verses or quotes, or someone's name.

And I was so glad to ceremoniously toss the heating and air ad in the trash.

Friday, November 18, 2011

Wreaths aren't just for holidays.

I've been trying to find different wall decor without spending much money lately, because I've been noticing all the bare spots lining the walls of our house. Browsing Pinterest reveals tons of book page wreath ideas, so I decided to give my own rendition a shot and see what I came up with.


It was so easy, and took no time at all.  I used a book I got for a plane trip to California from Dollar Tree for the pages, Scotch tape for the adhesive, a circle cut from a file folder for the backing, and a tulle poof for the center and hanger.


I rolled the pages into tubes and taped them. I made the poof by following standard pompom instructions and flattening the back of the pompom to fit it into the wreath center. Then I just arranged the paper rolls in a 2 layer wreath formation on the backing, hot glued in place, glued the hanger and center poof in place, and I had a classy simple wall hanging.  This would be pretty with sheet music, too.


I think for Christmas I'm going to make one of these using wrapping paper and a glass ornament for the center.  I think that would be so fun for the kids' doors. Now if I can just find a perfect Victorian frame, I'll have a perfect beginning to a gallery wall.

Sunday, November 13, 2011

Easy relaxation

I've discovered how to relax myself in 3 easy steps.

Step one- Change into pajamas and slippers.  The fuzzier the slippers, the better.
Step two- Make this drink.


In a giant mug, mix 8 oz hot coffee with one packet of hot cocoa mix.  Add two tablespoons or so of cream or milk.  Stir.
Step three- kick out everyone and turn down the lights.

Drink up. I don't know about you, but I have a date with my coffeemaker and a box of Swiss Miss tonight after everyone else is asleep.  Hello, e-books. Time for me to catch up on my House of Night novels.